Minggu, 17 Januari 2010

How To Install CentOS 5.1 on VMware Server

0 komentar
Part 1 :
Today I’m installing CentOS 5.1 on VMware Server as a test machine. I thought it could be helpful to some to know how to do this so here it is.First of all, if you don’t have VMware Server, you can get your free copy over at http://www.vmware.com/download/server/. I am currently running VMware Server 1.0.2 but you can get version 1.0.4 from their website. The host computer is running on an Intel Core 2 CPU at 1.86GHz with 2 gigabytes of RAM, a SATA hard disk and Windows XP SP2.

I won’t go into details about installing VMware Server, you can pretty much set it up with the default parameters.Creating The Virtual Machine

Since this is only a test machine, I don’t need much resource. Here are the settings for my virtual CentOS box:

  • 512 MB RAM
  • 12 GB SCSI hard disk
  • 1 Processor
  • Bridged ethernet adapter
  • CD-ROM

I have allocated all the disk space at creation time to increase performance.

Part 2 :

Installing CentOS 5.1


I’ve downloaded all the ISO images from http://ftp.usf.edu/pub/centos/5.1/isos/i386/ but you can also get a list of mirror servers from http://mirror.centos.org/centos/5/isos/.

We’re now ready for installation. Before turning on the virtual machine, you need to connect the virtual cdrom drive to the first CentOS iso image.

vmware-virtual-cdrom.jpg

When you’re done, hit OK and power on the virtual machine. When prompted for which installation method, choose the graphical one (just hit “enter”). You will then be asked to test the media CD. You can proceed if you think it’s necessary but I skipped the test.

At this point, I suggest you follow the CentOS 5.0 Perfect Setup. There’s no need for me to transcribe every details here. Let’s just say that I’ve followed the setup instructions with the intention of installing ISPConfig.

Part 3 :

Although your virtual CentOS server should be working fine at this point, it is recommended to install the VMware Tools to increase performance and functionnalities.

The VMware Tools do not have to be downloaded or whatever: they are made available from the VMware Server console.

Installing VMware Tools On Linux CentOS

While installing the VMware Tools on your guest operating system, it allows you to increase your virtual machine’s performance and capabilities.

Start by making sure you’ve got the kernel header files and a C compiler installed:

# yum install gcc gcc-c++ kernel-devel

Now create a link pointing to your kernel header files directory:

# ln -s /usr/src/kernels/[your kernel version] /usr/src/linux

From the VMware Server console, click on “VM => Install VMware Tools…”. This will connect a virtual cdrom drive with the VMware Tools installation files in it. You now need to mount it and install the VMware Tools manually:

# mkdir /mnt/cdrom
# mount /dev/cdrom /mnt/cdrom
# cd /mnt/cdrom
# cp VMwareTools-[version].tar.gz /tmp
# cd /tmp
# umount /mnt/cdrom
# tar zxf VMwareTools-[version].tar.gz
# cd /tmp/vmware-tools-distrib
# ./vmware-install.pl

I’ve left the VMware Tools parameters to their default values by hitting “enter” until the end.

When you’re done, simply reboot your virtual machine and you’ve got a nice new virtual web server.

Stay tuned for my upcoming post on how to install ISPConfig on CentOS 5.1.

Bookmark It

Cara Mereset Printer Canon Semua Tipe iP dan mP

0 komentar
Langkah-Langkah Reset Ink Tank Full Error Canon Seri iP dan mP

Tahap Pertama (Reset Hardware)
1. Matikan printer, lalu cabut kabel listriknya.
2. Tekan dan tahan tombol POWER di printer.
…(gunakan jari telunjuk untuk menahan tombol POWER ini)
3. Pasang kembali kabel listriknya.
…(jari telunjuk tetap menekan tombol Power)
4. Gunakan jari tengah untuk menekan tombol RESUME sebanyak 2 kali.
5. Lepaskan jari telunjuk anda dari tombol POWER.
…(Printer akan terdeteksi kembali sebagai printer baru)
6. Anda telah menyelesaikan tahap pertama untuk reset Ink Tank Full Error
…(lampu power berkedip-kedip). Lanjutkan ke Tahap Kedua!

Tahap Kedua (Reset Software) agar Permanen
1. Download Canon IP Resetter di sini
2. Ekstrak/Unrar file hasil download tersebut di sebuah folder,
…misal C:\Resetter Printer
3. Pastikan attribut semua file di folder tersebut bebas dari Read Only.
…caranya : pilih semua file (Ctrl+A) > klik kanan di salah satu file > pilih properties >
…matikan tanda check di attributes Read-Only > OK
4. Klik ganda file GeneralTool.exe > akan tampil menu aplikasi GeneralTool for …
5. Pada USB Port pilihlah port yang aktif untuk printer anda.

6. Pilih (check) pada EEPROM CLEAR.
7. Sediakan kertas kosong untuk print. Lalu Klik tombol TEST PATTERN 1.
8. Restartlah komputer anda, hingga deteksi printer baru tidak tampil lagi.
Selesai.

Selamat mencoba, semoga sukses!

Cara lain :

Jika ternyata dengan cara diatas tidak sukses, maka coba ganti cartridge dengan yang baru atau pinjam punya teman yang lain, semoga berhasil!

JENIS DAN TYPE SOFTWARE RESET PRINTER

Berikut jenis-jenis Software Reset printer sesuai dengan jenis printer yang akan di reset. Biasanya satu Software Reset bisa di gunakan untuk beberapa jenis printer. Seperti yang terlampir di bawah ini :

1. RESETTER CANON iP1700, iP1300, ip6600, iP6000, iP6210, iP220D, mP830
2. RESETTER CANON iP1200, iP1600, iP2200, iP4200, iP5200, mP150
3. SOFTWARE RESETTER CANON i250, i255, i320, i350, i355
4. SOFTWARE RESETTER CANON PIXMA iP1000, iP1500
5. SOFTWARE RESETTER EPSON

CX-4600,CX-5300,CX-5100, RX420, RX425, RX620, R1800, C50, C60, C61, C62, C20/C40, C43, C45, C41, C46, C65, C85,C86,CX-3600,CX-6600,R800,SC-740, RX600, Stylus400, 440, 480LPT, 480SXU/580, Stylus600, 640, 660, 670, 680/777, 740, 760, 800/850, 860, 880, 900/EM-900C, 980, 1160, 1520, 3000, C63, C64, C70, C80, C82, C83/C84, C85/C86, CX3100/3200, Cx3600, CX5200, CX5400, CX6400, Photo EX, Photo700/IP-100, 750/PM-770c, 780/790, 810/820, 825/915, 830/830U, 870/PM-875DC, R200/210, R300, R800, RX500, RX600, 890, 895/785EPX, 900, 925/934, 950/PM-950C, 1200/PM-3000C, 1270/PM-3300C, 1290,2200/PM-4000EPX, 5000/PM-5000C.

CANON iP1200, iP1600, iP2200, iP4200, iP5200, mP150

Tahap Pertama (Reset Hardware)
1. Matikan printer, lalu cabut kabel daya listrik
2. Tekan & tahan tombol POWER printer gunakan jari telunjuk
3. Pasang kembali kabel daya listrik
4. Gunakan jari tengah untuk menekan tombol RESUME sebanyak 2 kali
5. Lepaskan jari telunjuk anda dari tombol POWER
6. Anda telah menyelesaikan tahap pertama untuk reset Ink Tank Full Error
(lampu power berkedip-kedip)

Tahap Kedua (Reset Software) agar Permanen
1. Download aplikasi resetter (besar file 9,7 MB)
2. Ekstrak/Unrar di folder C:\IP1200
3. Pastikan attribut semua file bebas dari Read Only
4. Jalankan GeneralTool.exe
5. Pada USB Port pilih Port printer anda
6. Pilih (centang) EEPROM CLEAR
7. Sediakan kertas kosong untuk print, lalu klik tombol Test Pattern 1
8. Selesai, printer IP1200 dan IP1600 anda normal kembali

RESETTER print CANON :
Software Resetter Canon IP

resetter canon IP1900/1980 + petunjuk resetnya download aja di link berikut:
Petunjuk Reset Canon iP1900

lanjutkan dengan software berikut:
Software Resetter Canon iP1900

RESETTER print CANON type MP download aja di:
MP Tool Canon

PETUNJUK RESET print CANON MP Class download di:
Cara Pakai Resetter MPtool


Remaster Ubuntu LiveCD Dengan Reconstructor

0 komentar
Apa Sih Reconstructor Itu?

Reconstructor is an Ubuntu GNU/Linux CD Creator.
It uses the Desktop(Live), Alternate(Install), or Server disc as a base, and then allows for user customization.
For the Ubuntu Desktop base, you can customize the entire environment. For instance, you can add/remove software, change the default look (splash, themes, fonts, wallpaper, etc.), add desktop links, etc.
For the Alternate and Server bases, you can add any additional software to the disc that you would like installed.
Reconstructor is written in python and is licensed under the GNU General Public License (GPL).

Mengapa hanya bisa digunakan untuk Ubuntu/Xubuntu?

Karena Ubuntu/Xubuntu menggunakan desktop berbasis GTK dan menggunakan Display Manager yang sama (GDM), jadi pengguna yang paling banyak mendapatkan keuntungan dari Reconstructor adalah anda yang me-remaster Ubuntu atau Xubuntu LiveCD/Install CD saja.

Sedangkan anda yang menggunakan Kubuntu atau lainnya, hanya mampu melakukan beberapa kustomasi saja.

Langkah 1. Menginstall Reconstructor

Silahkan mendownload recostructor di http://reconstructor.aperantis.com.

Saat artikel ini ditulis, tersedia recontructor versi 2.7.

Untuk menginstall, lakukan:

sudo dpkg -i path/reconstructor-xx.deb

Untuk menjalankan reconstructor, Start Menu >> Application >> System Tools >> Reconstructor

Start Reconstructor - terminal Message

Langkah 2. Pre-check (modul, dependency)

Setelah dijalankan, reconstructor akan membuka sebuah terminal. Saat ini reconstructor akan mengecek keberadaan paket-paket dan tools serta modul yang terinstal di sistem anda. Perhatikan pesan yang dikeluarkan reconstructor, pastikan anda melengkapi lebih dulu kekurangan paket sebelum memulai.

Langkah 3. Select task live or install

Saat ini anda diijinkan memilih task atau pekerjaan apa yang akan dibuat. Di sini kta akan memilih LiveCD.

Langkah 4. Create direktori (working dir, live root)

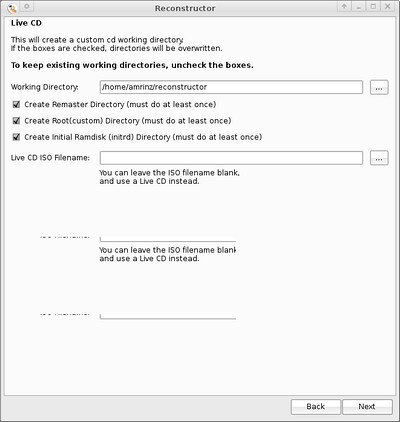
Setup remaster environment

Reconstructor akan membuat beberapa direktori di home folder anda. Secara default, reconstructor akan membuat sebuah direktori, reconstructor. dan didalamnya akan dibuat tiga direktori lagi:

  • root untuk mengkopi isi filesystem.squashfs atau live system
  • initrd untuk mengkompilasi intrd yang baru
  • remaster untuk meletakkan file-file kopian dari CD yang akan dikompilasi menjadi ISO

Langkah 5. Copying LiveCD

Insert LiveCD

Langkah 6. Extracting Squashfs fs

Langkah 5 dan 6 serta langkah terakhir ini memakan waktu cukup lama. hampir semua resource PC digunakan.

Langkah 7. Customizing

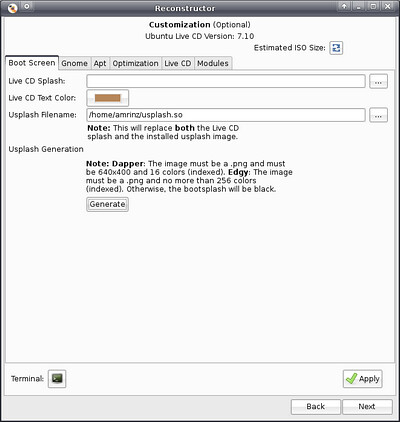
  • Customizing Boot Usplash dan GNOME Splash

    Customizing usplash and boot process

    Saat ini anda harus menyiapkan sebuah file png dengan ukuran 640 x 400 pixel dan indexed 16 color untuk Dapper. Sedangkan untuk Gutsy anda perlu menyiapkan sebuah file png dengan ukuran 800×600 dan 256 warna indexed.

    Klik tombol generate untuk membuat/mengkonversi file png anda menjadi file usplash.so. Kemudian masukkan lokasinya di field usplash location.

    Sedangkan untuk GNOME splash, silahkan ikuti tutorial ini.

  • Customizing Gnome
    Customizing GNOME

    Di sini sepertinya tidak ada masalah. Anda pasti bisa melakukannya. Jika anda memiliki ikon set sendiri, letakkan di direktori /usr/share/icons/ pada direktori kerja reconstructor anda (root).

    Jika anda ingin merubah ikon start menu, ikuti tutorial ini.

  • Customizing Apt Sources

    Customizing Apt Sources
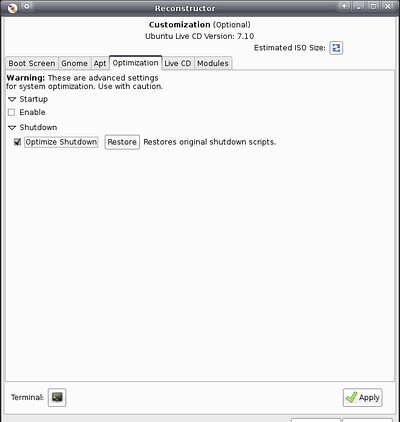
  • Optimizing Boot Process

    Customizing Ubuntu LiveCD Boot proces

  • Customizing Reconstructor Modules customizing recostructor modules
    customizing reconstructor modules

    Modul-modul yang terdaftar di tab ini akan didownload, jadi siapkan koneksi internet anda.

  • Customizing User customizing Ubuntu LiveCD user

    Saya rasa ini juga mudah. Silahkan manfaatkan sesukanya. Jika anda set password, anda akan menghadapi login screen lebih dulu (? not tested yet)

Langkah 8. Using Reconstructor Terminal

Bagaimana menggunakan reconstructor terminal untuk kustomasi? Klik ikon terminal di bawah jendela reconstructor.

customizing menggunakan terminal

Langkah 9. Manual Customizing

Jika anda memiliki paket sendiri yang sudah anda download atau kompilasi sendiri dan akan anda install, kopikan file tersebut ke direktori kerja reconstructor/root/ dan eksekusi menggunakan dpkg.

Jika anda menggunakan repository lokal (DVD/ISO), gunakan perintah berikut ini:

Download paket-paket dari repo lokal:

sudo apt-get -d install

Kopi file hasi download ke direktori kerja reconstructor, pada contoh lomuntu-tmp.

cp /var/cache/apt/archive/* /home/amrinz/reconstructor/root/lomuntu-tmp/

Kemudian untuk menginstallnya, lakukan ini dari reconstructor terminal.

cd lomuntu-tmp

dpkg -i *

Jika program yang akan anda tambahkan bukan paket deb, seperti xampp dan flash plugin. Gunakan cara ini. Kopi kan folder lampp ke direktori /opt di direktori kerja reconstructor (root/opt). Untuk mengkopi, anda bisa menggunakan thunar atau nautilus sebagai root.

run thunar as root

Screnshoot dibawah ini menunjukkan proses instalasi flash plugin dari adobe.

installing package manual using dpkg

Langkah yang sama juga berlaku untuk paket lain, misalnya wine.

Langkah 10. Building ISO files

Building iso files

Ini adalah langkah terakhir, jika anda sudah siap, silahkan klik rebuild.

Catatan:
Milik saya sendiri mengalami error, metacity tidak berjalan saat masuk desktop, jadi window tidak memiliki dekorasi border.

Lampiran:

Finish!